Found these two sprite sheet generators which are really cool.
http://www.piskelapp.com/p/agxzfnBpc2tlbC1hcHByEwsSBlBpc2tlbBiAgIDI5oTOCAw/edit
There's even onion skin so that you can animate your stuff pixel by pixel. Gonna try it out with a gif.
ww.leshylabs.com/apps/sstool/
This ones pretty cool too. But I had to rename the entire PNG sequence because this online generator reads it numerically from 0-end. Yeah I took a green screen video, Key Lighted it to remove the green screen and rendered 2 secs of it out into RGB+Alpha format so the transparency is still there. 2.09 secs of the video gave me about 57 Pngs.
Here's a fiddle.
https://jsfiddle.net/simurai/CGmCe/

Sunday, December 6, 2015
Wednesday, November 11, 2015
Thursday, October 22, 2015
Cool parallax mouse over
My website
http://toa.edu.my/showcase/degree/interactive-media/assets/images/im9/root/index.html
The Script
http://codepen.io/yvesvanbroekhoven/pen/igtmy
http://toa.edu.my/showcase/degree/interactive-media/assets/images/im9/root/index.html
The Script
http://codepen.io/yvesvanbroekhoven/pen/igtmy
Wednesday, October 7, 2015
Wooband wifi
I had my dad help me replace the batteries and the jammed up liPower (I can't sew, I fail as a woman) with some conductive thread and hook up my wifi xbees which SEEMED to be working fine when I tested them out with alligator clips (which are Jam's which I have yet to return to him).
HOWEVER,
When everything is sewed up, the rgb gets jammed at light blue. Tested it with Unity and found out the wiring must have messed up the connections to my accelerometer chip.
Here are some pics. I'm just too...lazy to troubleshoot. So I'm just gonna show whatever I have at TOA tmr while I fix this problem one day in the future.


Thursday, September 17, 2015
Configuring and Connecting HC-05 Bluetooth to Mindwave edited by coty

Here's a selfie of me and the mindwave. LOL
I realised that there are no proper tutorials that address the 100000000000 problems I had with the module. People actually took weeks to make this work. (they said so in their blogs and in forums)
Get that thang into AT MODE first
BASIC CONFIG
///HOW TO CONNECT HC-05 TO AT MODE///
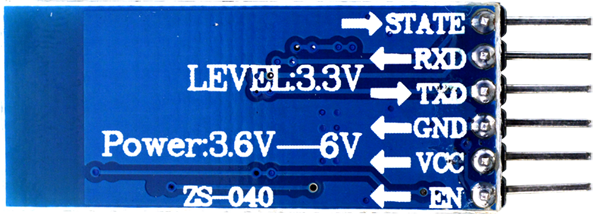
//STATE and EN(KEY, on some boards) not necessary to hook them up//
1º Connect TX with 10,RX with 11,VCC(3.3v) (I used 5v also ok) and GND
2º Load the program in Arduino
Model ZS-040
1º Push button in bluetooth module and hold (DO NOT LET GO)
2º Disconnect VCC of bluetooth module and pluck it back in
3º Release button (OK LET GO) - Led must flash very slow. about 2 secs interval Now you are in AT MODE
4º Reset Arduino with reset button
5º Start the Monitor Serial, select "Both NL & CR"
6º Enter command "AT" and Enter. You must receive OK.
MINDWAVE configuration
Get the unique identifier from the Bluetooth devices: 74e5,43,9c5fe8
Problems I encountered
//make sure its at 3.3V instead of 5V, the hc05 can't handle it.
//RX-RX, TX-TX for configuring (in this case its pin 10 & 11)
//RX-TX, TX-RX only if looking out for output
Honestly, just switch it around until you get something out of the serial monitor. Different sites and trial and errors are telling me different things.
//mindwave ID - remove semicolons and replace with commas. make sure its 4,2,6 digits
//To pair with Mindwave, press reset button on board then switch on Mindwave after like 4 secs. Push the knob on the mindwave up to pair it. You don't need to push up the knob the second time you pair it, it would connect automatically. BUT, if you reboot everything (ie. plug out the USB and plug it back in, the connection is automatically severed and you have to pair it again. Like push the knob.)
The led should turn solid blue and shouldn't blink. Check your Serial monitor and make sure its set at 57600 baud rate, Both NL & CR//
//Once connected, if you switch between baud rates in the serial monitor your connection will be cut off.
Solution: restart it again.//
//If you cannot pair the mindwave automatically, it is probably the password problem.
Solution: Try configuring it to either 1234 or 0000. I changed mine to 0000 and it worked.//
//IF YOU GET THIS ERROR:
Basically you have trouble uploading the new sketch(it takes forever) unto the board and you get this error at the console.
avrdude: stk500v2_ReceiveMessage(): timeout
avrdude: stk500v2_getsync(): timeout communicating with programmer
Solution: Unplug the VCC power wire Hc-05 from the board and upload the sketch. Once the upload is done, plug it back in. voila.//
CURRENT PROBLEM
//COM PORT ERROR IN USE although there's totally nothing using it here's a link to a forum that explained my problem but never really solved it.
http://forum.arduino.cc/index.php?topic=134039.0

I got this problem because my PC automatically shuts down the port after awhile, stopping the board from receiving any data from the mindwave. It would only send about like 6 lines of information then just completely shuts off the port.
Solution: not yet found but a lot of them are blaming something in the PC or the USB for shutting it down. I tried to do this:
Write "regedit" to start/run and open it.
At opening window you will see a group of folders left side.
Choose HKEY_LOCAL_MACHINE \ SYSTEM \ Curr entControlSet \ Control \ Windows \ ErrorMode
Right click to ErrorMode and open.
Than change the number (0) to (2)
(If its already (2) dont make any change, this means
your problem is not an USB connection problem so
my method will not help you to fix this problem)
Restart the computer.
First connect your Arduino to USB, than open the IDE software.
Load your sketch.
But it still doesn't work. My com keeps shutting off the port.//
_______________________________________________________________________________At opening window you will see a group of folders left side.
Choose HKEY_LOCAL_MACHINE \ SYSTEM \ Curr entControlSet \ Control \ Windows \ ErrorMode
Right click to ErrorMode and open.
Than change the number (0) to (2)
(If its already (2) dont make any change, this means
your problem is not an USB connection problem so
my method will not help you to fix this problem)
Restart the computer.
First connect your Arduino to USB, than open the IDE software.
Load your sketch.
But it still doesn't work. My com keeps shutting off the port.//
EXTRA NOTES

this unsigned one-byte integer value describes how poor the signal measured by the
thinkGear is. It ranges in value from 0 to 200. Any non-zero value indicates that some sort
of noise contamination is detected. the higher the number, the more noise is detected.
Basically, the lower the number , the better.
Attention:
Determines the case in the code based on what is received
Time since last packet:
Millis (how much time has lapsed since last reading.
Info from: http://www.uninettunouniversity.net/allegati/1/CommonFiles/Eventi/it/30/705/Brain%20Computer%20Interface%20System.pdf
_______________________________________________________________________________
//Sketch to upload to MEGA for Bluetooth//
//hit Enter after typing AT
#include <SoftwareSerial.h>
#define rxPin 10
#define txPin 11
SoftwareSerial mySerial(rxPin, txPin); // RX, TX
char myChar ;
void setup() {
Serial.begin(9600);
Serial.println("AT");
mySerial.begin(38400);
mySerial.println("AT");
}
void loop() {
while (mySerial.available()) {
myChar = mySerial.read();
Serial.print(myChar);
}
while (Serial.available()) {
myChar = Serial.read();
Serial.print(myChar); //echo
mySerial.print(myChar);
}
}
https://www.pantechsolutions.net/interfacing-mindwave-mobile-with-arduino
http://blog.theinventorhouse.org/como-conectar-bluetooth-hc-05-arduino-y-diadema-mindwave-neurosky/
Wednesday, July 1, 2015
WIFI Configure Baud rate to 38400 instead of 9600 for both XBEES
http://cpham.perso.univ-pau.fr/WSN/XBee.html
Baud rate lists for ATBD
1 = 2400bps
2 = 4800bps
3 = 9600bps
4 = 19200bps
5 = 38400bps
6 = 57600 bps
7 = 115200 bps
http://forums.trossenrobotics.com/tutorials/how-to-diy-128/xbee-basics-3259/
These two are very reliable tutorials.
ATBD5
OKATWR (to save and lock in)
OK

And Saiful told me that I could use my powerbank to power my boards HAHAH
Wednesday, March 11, 2015

Subscribe to:
Posts (Atom)